The KleverList plugin provides several global settings to customize your email marketing integration. You can choose to enable or disable them based on your specific needs and preferences.
| CONFIGURATION ITEMS | DESCRIPTION |
|---|---|
| Global Settings | Options and extra features that can be enabled or disabled, and are applied globally. |
Step 1: Connect to the WordPress Admin area
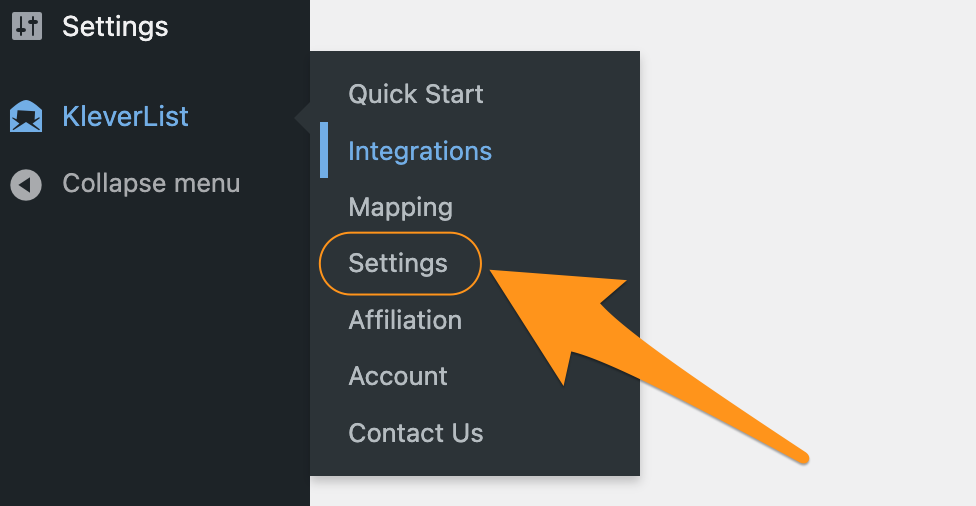
From your WordPress admin area, look for KleverList in the left bar. Then, in the KleverList plugin settings, navigate to the “Settings” section.
Now, let’s delve into the specific details of each configurable setting available on the Settings page.
Step 2: Fine Tune the Global Settings
For each setting, you will find a description and information on how to use it effectively.
| Name: | Default List Choice |
| Mandatory: | Yes |
| Action: | Enable/Disable |
| Description: | Available on Sendy Integration, a “catch-all” list is used when no lists are associated with a product. The “Default List Choice” setting allows you to select a default Sendy list to which customer information will be sent in case the integration is active, but no specific lists have been assigned to a WooCommerce product. Depending on your use cases, it can be used either as a Generic list or as a backup/catch-all list. |
| Available: | Free + Pro Versions – Sendy |
| Name: | Resubscribe |
| Mandatory: | No |
| Action: | Enable/Disable |
| Description: | The “Resubscribe Option” toggle enables the feature that allows you to resubscribe previously unsubscribed users to your lists/audience. When this option is enabled, previously unsubscribed users will be resubscribed after checkout. This option can be enabled when the “Order Processing” or “Order Complete” status has been triggered. |
| Available: | Free + Pro Versions – All Integrations |
| Tutorial: | Video Tutorial on the Resubscribe Option |
| Name: | 1-Click Activation |
| Mandatory: | No |
| Action: | Enable/Disable |
| Description: | This toggle provides the convenience of activating the KleverList integration on all your WooCommerce products with just one click. Enabling this option ensures that the plugin is active for all products without the need for individual configurations. For Sendy Integration, if the option is active and no previous list has been specified for a specific product, the Default List will be used. This option can be enabled when the “Order Processing” and/or “Order Complete” status has been triggered. |
| Available: | Free + Pro Versions – All Integrations |
| Tutorial: | Video Tutorial on The 1-Click Assignment Feature |
| Name: | Privacy Consent |
| Mandatory: | No |
| Action: | Enable/Disable |
| Description: | This setting adds a checkbox for obtaining user consent during the checkout process. When enabled, a checkbox will appear on the checkout page, and users must give explicit consent for their information to be added to the designated lists/audience. This feature helps ensure compliance with privacy regulations and promotes transparent data handling practices. You can write your own text for the Privacy Consent warning that will be shown on the checkout page. Also, you can choose whether to have the checkbox ticked or unticked by default on the checkout page. Please note that if the “Resubscribe” option is disabled, a previously unsubscribed user will not be added to the list even upon specific consent. |
| Available: | Pro Version – All Integrations |
| Tutorial: | Video Tutorial on the Privacy Consent Options |
| Name: | 1-Click Migration |
| Mandatory: | No |
| Action: | Enable/Disable |
| Description: | Once you activate the Migration toggle in your settings, a new “Migration” page shows up on the KleverList menu. From there, you can choose your target list or audience (depending on your integration) and initiate the migration of your WooCommerce customer base with a simple click. This process is asynchronous, allowing you to continue your tasks while the migration is running. You can choose whether or not to overwrite data on customers already present in the list/audience. The 1-Click Migration is aligned with your mapping preferences for a precise transfer of your existing customers, making it perfect for a one-time, stress-free migration. |
| Available: | Pro Version – All Integrations |
| Tutorial: | Video Tutorial on The 1-Click Migration Feature |
Remember to click the “Save Changes” button at the bottom of the page to apply any modifications to the settings.
That covers the settings page of KleverList, providing you with flexibility and control over how your email marketing integration functions.
You can now proceed to the next section, Mapping, to configure how the WooCommerce billing and user fields map to your email marketing platform.